How Deal Toys are Actually Made
Lucite Edition
Lucite is one of the materials most closely associated with deal toys, yet very few people outside this specialized manufacturing world have ever seen how a Lucite piece is actually made.
The process is hands-on, technical and surprisingly artistic. It is very different from mass production and it explains why the best Lucite awards have a clarity and depth that feels almost sculptural.
Lucite’s role in commemorative design is part of a broader material evolution discussed in From Lucite to Legacy.
How and when Lucite should be used depends heavily on design intent, a distinction explored in Design vs Material: What Makes It Meaningful.
This guide walks through the real process behind cell cast Lucite for deal toys. It covers how the material is mixed, molded, cured and finished and explains how design decisions and production knowledge work together to create a final piece that is stable, clear and structurally sound.
If you have ever wondered how a block of Lucite goes from a milky, reactive slurry to a polished financial tombstone, this behind the scenes guide will give you the full picture.
What You’ll Learn
How Lucite is mixed, cast and cured using small batch cell casting
Why deal toys require a different Lucite process than sheet acrylic
What technicians look for when preventing bubbles, warping or distortion
How embedments are positioned and secured during multi layer pours
Why cardboard molds are used and how shrinkage affects the final shape
How cutting, sanding and polishing turn a raw casting into a crystal clear form
What production risks most clients never hear about and how experts avoid them
Materials Used in Lucite Casting
Lucite begins as a combination of two primary components. The first is a clear liquid monomer that resembles water and the second is a powdered polymer that looks like flour. When blended, these two materials create a thick white slurry that eventually becomes the clear Lucite block.
Manufacturers can adjust the ratio of liquid to powder depending on the needs of the piece. A larger block or a complex embedment may require a thicker mixture. A thinner mixture may be used for smaller or less demanding pours. An initiator is added at the right moment to trigger the chemical reaction that transforms the mixture from a liquid into a solid.
This part of the process requires experience. If mixed too aggressively, trapped air can create bubbles. If mixed without the correct temperature control, heat can build too quickly and distort the embedment.
Preparing the Mold
Every custom Lucite piece begins with a custom mold. For deal toys, these molds are often made from cardboard because they are inexpensive, disposable and easy to shape for one-off or small batch production. Metal molds may be used for repeatable shapes or higher volumes, but cardboard is far more common for bespoke deal toys.
The mold is built larger than the final size because Lucite shrinks as it cures. Extra material is built in so the piece can be shaped, cut and polished to its exact final dimensions.
Before pouring, the mold is secured, leveled and prepared so the material does not leak. Even this step requires judgment. A poorly prepared mold can introduce contaminants or create uneven curing.
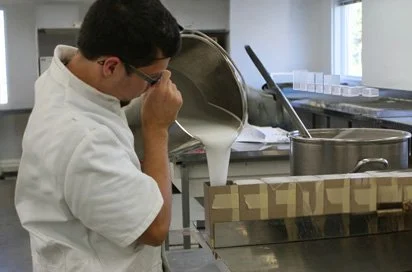
Pouring the Lucite Mixture
Pouring is done in layers. The first layer goes into the mold and is allowed to settle until it reaches a semi-firm stage. This prevents any embedment from sinking or distorting. The time required varies from hours to most of a day depending on temperature, humidity and mixture density.
Once the first layer is firm enough to support weight, the embedments are positioned by hand. These may include:
printed acetate panels with deal text
logos
product components
coins or commemorative objects
resin or metal miniatures created for the design
After placement, additional Lucite mixture is poured carefully on top to encapsulate the embedment fully. Precision matters at this step because any trapped air can create optical defects.
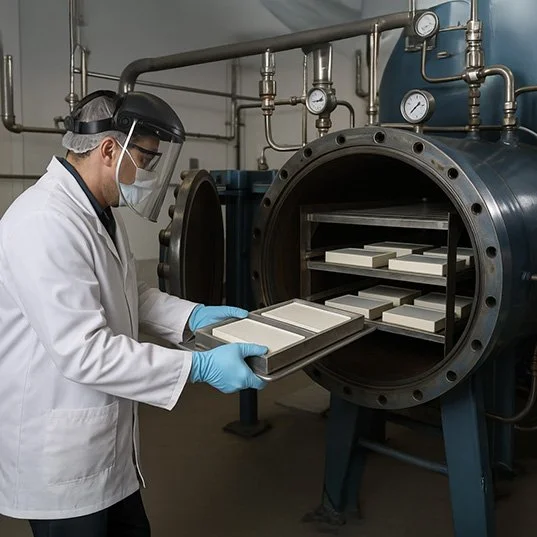
Curing in the Autoclave
Once the mold is filled, the entire piece is placed into an autoclave. This is a pressurized oven that controls temperature and nitrogen pressure during curing. The pressure must be high enough to prevent bubbles from forming inside the block.
Inside the autoclave, the Lucite mixture undergoes polymerization. This is an exothermic reaction that generates heat and transforms the white slurry into a hard, clear acrylic. Temperatures inside the block can rise to very high levels, and the reaction needs to be controlled so the embedments remain stable.
Curing time varies by many factors, and gauging the time required for any given load (typically between eight and twelve hours) is among the skills cast acrylic master craftsmen develop over years of hands-on experience. When finished, the block is allowed to cool slowly before it is removed from the mold.
Demolding and Shaping the Block
Once cured and cooled, the block is removed from the mold. Because the mold was larger than the final intended dimensions, excess material is trimmed away. Sawing, planing and rough grinding remove the outer layer and reveal the embedded design beneath.
This is often the moment when the clarity of the piece begins to show. A well cured block will already look cleaner and more uniform than an uneven or improperly mixed one.
Sanding and Polishing for Optical Clarity
After shaping, the block goes through progressive sanding. The surface is smoothed with increasingly fine abrasives. The base is diamond honed for flatness and stability. Any scratches, fogging or casting marks are removed during this stage.
The final polish brings the block to the crystal clear finish associated with Lucite deal toys. This step determines much of the final quality. A poor polish can leave swirl marks or cloudy spots that weaken the visual impact of the piece. A great polish creates a sense of depth and sharpness that is unmistakable.
Screen printing, laser engraving or secondary pours may be added after polishing if the design calls for additional layers or surface detail.
Why the Lucite Process Matters for Design
Understanding how Lucite behaves is essential for design. Certain shapes cast better than others. Some embedments are sensitive to heat or pressure. Some inks or adhesives react to the curing process. Designs with thin lines or narrow cavities may be prone to stress cracking if not engineered correctly.
This is why experience with real Lucite casting environments matters. The best designs are created by people who understand every step of the process and know how to avoid the pitfalls that come from using the wrong materials or pushing the medium beyond safe limits.
What Most People Never See in Lucite Production
Lucite casting is not an automated, push-button process. Every pour, embedment and cure cycle involves hands-on adjustments by skilled technicians. The clarity, stability and absence of bubbles that people associate with high-quality Lucite are the result of experience, timing and careful control over the chemistry.
Two pieces that look identical in a photo can be worlds apart in how they were made, and that difference is often invisible to clients until a piece yellows, cracks or shifts years later. Understanding the process ensures you get a piece that lasts, not just a piece that looks good in a proof.
“A Lucite embedment that looks perfect is usually the result of dozens of small decisions made by someone who understands how the material behaves.”
Lucite Is Only One Part of the Story
Lucite is a versatile and powerful material, but it is only one option. The most effective deal toys begin with a concept and a story. From there, the material is chosen to support the idea. Sometimes Lucite is the right choice. Sometimes crystal or metal or resin is more appropriate.
The value of industry experience is knowing how to make these decisions correctly.
If you are planning a deal toy project and want unbiased guidance on materials, design or production feasibility, the Learning Center exists to help you understand the process clearly and confidently.
Recommended Next
Expert Insight: Why Autoclave Work Is a True Skill
Lucite curing is a chemical reaction that creates its own heat. Even experienced technicians monitor pressure, temperature and timing closely to avoid internal stress, bubbles or warping. The autoclave stage is where quality is either locked in or lost forever.